Wednesday, August 21, 2013

TOP SECRET: Super soft hair


I hate drying my hair after a shower. HATE. Here I am freshly clean and smelling great then I have to stick my head under the torture of an appliance that's sole purpose is to blow hot air. Sure, it dries my hair but it also makes my head sweat and didn't I just get out of the friggin' shower???
Enter: my bedroom fan. One day I'm frying my hair with the blow dryer and hating my sweaty head so I decide to stand in front of my big bedroom stand fan as I'm blow-drying. (setting:high)
*ZING*
Sweat-head gone. Hair is drying. And as a bonus to resolving my conundrum...ta-da...the final result was luxuriously soft hair. "Like, seriously" soft hair.
I figured it was a fluke. Maybe I had left conditioner on for a longer or something.
Next day I hot/cold my hair again with the bedroom fan and hair dryer.
Butter-soft hair again.
Me. Likey.
So there you have it; Amy's secret to uber-soft hair - obnoxious hair dryer and bedroom fan set on high.
You're welcome :)
Pin It!

Saturday, May 4, 2013

Make Caramel using ?

I found this recipe for some no bake Twix Bars and the most awesome thing (I think) is how you make the caramel.  Graham Crackers...yep...you heard me right you use sugar, butter and graham crackers.  It is amazing and tastes good too.  And because we are low sodium in my house, I used Unsalted Tops Saltine Crackers instead of Club crackers, and Unsalted Butter instead of margarine.  They are so easy, and surprise they do taste like a Twix candy bar.  If you decide to try the low sodium I don't think you would even notice. :)


Twix Bars
2 pkgs Unsalted Top Saltines {or cracker of choice}

Caramel Filling
1 cup Graham Crackers, crushed
3/4 cup Brown Sugar,packed
1/3 cup White Sugar
1/3 cup Milk
1/2 cup Unsalted Butter

Icing
2/3 cup Peanut Butter
1 cup Milk Chocolate Chips

Bars
Begin my putting a layer of Unsalted Tops Saltine Crackers in a pan.
In a saucepan on the stove, combine the caramel filling ingredients.
Bring to a boil, continue to stir and boil for approximately 5 minutes.  
The mixture will be caramel like and pull away from the sides of the pan.
Pour over the crackers, being very careful, the mixture is extremely hot.
Immediately top with another layer of crackers, pressing down slightly
Place in fridge to chill for at least 30 minutes.
Combine peanut butter and chocolate chips in small bowl. Microwave for 2 minutes, stir well and frost crackers.
Pin It!

Sunday, April 28, 2013

DIY Shaving Cream

Hives...they were everywhere.  They were itchy and soooo annoying!
I could not figure out what I was allergic to.  I tried my body wash, laundry soap and then a thought...I should check my shaving cream.  Tada...I am allergic to shaving cream....really!
How annoying is that!
So I perused Pinterest in search of a DIY shaving cream.  Found it...and it is awesome!
You should have everything in your house or just go buy some cheap shampoo, conditioner and lotion/hand cream that all has similar scent.

Shampoo, conditioner, lotion/hand cream and baby oil.   Mix them all together and put in a container.  
I put it in my empty conditioner container that has a pump on top.  One of the things I have found with this shaving cream is how smooth my legs are after shaving with it.  I also don't have to shave as often, which is another added plus.  Hopefully, you won't have to make your own shaving cream because you are allergic to it, but it really is cheaper and I think it is better than the store shaving cream.  Enjoy!

DIY Shaving Cream
1 Cup Shampoo
1 Cup Conditioner
5 Tbsp Lotion/Hand Cream
5 Tbsp Baby Oil

Mix together and store in container.
Pin It!

Monday, April 1, 2013

Baked Tacos

I have discovered a new favorite for dinner.  Of course, I found this on Pinterest.
I tried it out on my family and they LOVED it!  It is so easy and so good.
Try it out for your family and they will enjoy it too.


The original recipe is from One Good Thing By Jillee.  I love her website, she has lots of fun things.
You can make your own hard shell tacos.  Preheat your oven to 375 degrees.  Spray the corn tortillas with cooking oil spray on both sides and drape over two bars in your oven.  Bake for 5-7 minutes.  
In a pan, brown the hamburger and add one can of refried beans, tomato sauce or taco sauce and taco seasoning.  Fill your taco shells with the meat mixture and top with lots of shredded cheese.
Bake at 400 degrees for 5-10  minutes.
Cover with additional toppings of choice and enjoy a marvelous meal. :)
Pin It!

Thursday, March 7, 2013

Chicken Bacon Ranch Pizza


This last weekend Amy and I had Lotsa Motsa's Chicken Bacon Ranch pizza. If you have never experienced Lotsa Motsa before, then you need to go. Now. :)
Yummy! I was trying to describe it to my husband and thought I should just make it for him. It is pretty close and really easy to make.

Chicken Bacon Ranch Pizza
Pizza Dough:
1 pkg Active Dry Yeast (2 tsp)
2 tsp Sugar
1 Cup Water
1/4 Cup Shortening
3-4 Cups Flour
2 tsp Salt
Olive Oil

In a bowl whisk the yeast, sugar, water and shortening to make a paste. Add the flour and salt. Using a dough hook, mix until the dough crawls up the hook. Remove from that bowl and place in a bowl greased with olive oil. Cover with plastic wrap and let rise until double in size. Turn onto a floured surface and divide in half. Roll into balls and let rest for 15-20 minutes.

Ranch Dressing
Mozzarella Cheese
Chicken, grilled and chopped
Bacon pieces

Roll out the dough onto a pizza pan or stone. Spread lots of ranch dressing over the dough. Cover with lots of cheese. Add the chicken and bacon pieces. Then cover again with lots of cheese. Bake at 425 degrees for 15-20 minutes.


Pin It!

Wednesday, January 2, 2013

Honey Jalepeno Shrimp Stir Fry w/Tofu Noodles

Hola!  Erin here!  So I am on this amazing diet and wanted to share a dish I made tonight that was excellent!  Fairly low carb and satisfied the pasta craving I was having without ruining my diet.

1/2 lb. honey jalepeno shrimp (I bought it from Harmon's)
broccoli
cauliflower
mushrooms
red peppers
orange peppers
onion
1 tbsp. olive oil
1 package tofu fettucine noodles

Drain and rinse the tofu noodles and set out to dry for a bit.Heat tablespoon of olive oil in fryer and add vegetables.  Stir vegetables til they are to your content.  Add shrimp and stir.  Add noodles and stir, let noodles get hot and you're done!!

It was so easy to make and very tasty.  You can add seasoning as you would like but I'm limiting all that so I just ate it as is.  The tofu noodles are actually really good because they just absorb the flavor of what you cook with them.  I know it's not all that fun to eat good, but thought I would share!
Pin It!

Sunday, December 30, 2012

Nutella Blondies

Mmmmm...these are so good! 
 I love kevinandamanda.com, she has the most amazing recipes and her blog is just fun.
 Follow her and you won't be sorry.  
She had this recipe, and I just got around to making them.
Nutella Blondies.


The reason I decided to make them...I found this lovely little bottle at Smith's.  In case you cannot see what it says.  That would be Kroger brand CRUNCHY Hazelnut Spread.  I am not usually one who likes crunchy anything...but I thought I would try this.  Crunchy Nutella...it is HEAVEN!
Spoon dipping helped remove half of the contents of the jar...I needed to save the rest for making a yummy treat.  It was worth it.


After swirling in the Nutella I wanted to just eat the batter...but I resisted and baked the blondies.  
They turned out so awesome and very tasty.


For the recipe, click here.
Enjoy!

-Kelli
Pin It!

Friday, December 7, 2012

Bordeaux Candy

See's Candy... do I need to say anything else! :)
Yup...Bordeaux bar.  For as long as I can remember we have always gotten one of these lovely little chocolate bars for Christmas.  They are so good.  But now the price of them is just a little crazy so I decided I wanted to try making them.  Searching the internet and Pinterest and this is the best recipe I could find.
Since it is Christmas time and we all love candy, why not try making some.  
I had good intentions of making them for neighbors...but they didn't get that far. :)


The first step is to melt your butter and brown sugar in a saucepan and let it boil.
Add cream, coffee and salt, boil again and then let it cool.  Add powdered sugar.


You can just stick it in the fridge to let it firm up.  
I went ahead and made my truffle balls and then stuck them in the fridge to get firm.
Then dip them in melted chocolate and let them firm again in the fridge.


You have just made a magnificent truffle.  They are good.  The next time I make them I am going to cut back on the coffee because that flavor was too strong for me.  But otherwise, they are pretty close.

Bordeaux Candy
1 Cup Brown Sugar
1/2 Cup Butter
1/4 Cup Heavy Whipping Cream
1/4-1/2 tsp Instant Coffee
Pinch of Salt
2 Cups Powdered Sugar
12 oz Chocolate

Melt the butter and brown sugar in a saucepan.  Bring it to a boil and let it roll for 2 minutes.  Stir in the cream, coffee and salt.  Let it boil again for another 30 seconds, stirring constantly.  Remove from the heat and let it cook for 10 minutes.  Add the powdered sugar and stir well.  Chill until it holds shape.  Roll into small balls or bars.  Melt your chocolate according to package directions.  Dip you balls into the chocolate and let set in the fridge.

Kelli
Pin It!

Wednesday, October 31, 2012

Zombie Cake

I was having so much fun with the recipe for butterfinger dough, that I just couldn't stop with chocolate-covered fingers as a dish in themselves.
Since I was destined to make a cake for the Elementary School Halloween Carnival, I thought, "Hey. You know what else I could do with edible fingers? Make them look like they're coming out of a cake...you know, zombie-unearthing-itself fashion. That would be awesome!"
Too scary for elementary school kids?
I think not.
Have you seen the garbage parents let their kids watch these days?
So let's get this cake on!
First, find yourself some green apple candy corn.
 
Yep. Green. Apple.
It gives the peanut butter dough a zippy kid-tastic flavor that grosses parents out but kids will eat it up just because of that fact.
 
Take an overflowing 1/2 cup of the candy corn
and
1/2 cup creamy peanut butter
and melt them in your microwave for about forty seconds then stir.
Keep going in fifteen seconds bursts until the candy corn is mushed completely into the peanut butter.
Add one to two drops green food coloring just to buff out that awful brown and make these puppies look extra rotten. 
Now, as before, feel your inner-child and play it up.
I did ten fingers, including pinkies and thumbs and there was some leftover for snacking.
To get the awesome curvature of real fingers digging themselves out of a bone-yard, I prepped a rolling pin with some parchment tucked around the curve and some rumpled foil underneath to prevent any actual rolling out of that rolling pin, the tricky little devil.
Place your ghoulish fingers across the pin and cool in the refrigerator.
 
Not pictured: the two 9x9 chocolate cakes I made.
Forgive the oversight and lack of picture. Someday my recipe blogging will improve, I promise.
 
Alrighty, get your powdered sugar and a medium bowl. Dump about a cup and half in there and give it a heavy dousing of red and blue food coloring. If you give it enough, it will be almost black.
Rad, right? Black icing? Alright, purplish-black.
but Halloween-y enough for our purposes. 
 
Now give your cakes a nice drizzle all over. Don't make it pretty. It's Halloween. Make it cReEpY. 
 
 Ready for the fingers? Make your hand look scary, like this, and use it to guide your finger placement in the top of your cake.
 
In a smaller bowl, whip up a smaller batch of powdered sugar, this time using green food coloring.
Using a cotton swab, dab the fingernails so these green things look like fingers and not worms. As I was assessing the cake after placement, I realized they could be confused with worms if effort wasn't made to made them look finger-like. So even, if these are the nails of a dead dude, we're gonna stick some gooey zombie blood on them just to be sure. 
 
Since you have extra green, go ahead and toss it around the cake. It looks good in green, too.
 
Ladies and gentlebeasts,
ZOMBIE CAKE. 

Pin It!

Sunday, October 28, 2012

Sickening Sweets


So I know this is kind of short notice, considering the big Halloweenie is three days away, but if you are looking for some gory goodies to gross out your friends or neighbors...I've got a couple for you!
Before I begin, I need a big shout out to PINTREST, without whom, none of this would have been possible. Thanks, P-diddy. You've some wicked cool ideas.
 
Let's start with moldable, tasty homemade butterfinger dough.
Yes. Homemade.
Here's what you need;
16 oz. of creamy peanut butter.
a pound of candy corn.
 
You still with me?
Phew. I'm tired already.
Now, in a microwave safe bowl, melt the candy corn in the nuker for about a minute.
Stir.
Continue to melt in 15-second intervals until it is no longer candy corn but candy mush.
Add your PB and stir.
You may have to pop it back into the microwave for a few seconds but keep stirring.
Put your back into it!
I know it looks ugly and about now you are wondering if this is a spectacular Pintrest Fail moment. Don't give it up yet! Keep stirring until it is a lovely orange glob of peanutty goodness.
While it is warm and pliable, dredge up some of that inner-child and go to town.
Make some fingers. 
 
...A funky pair of ears and some noses...
 
 Don't you just feel like a kid again??? Hurry up! The dough is cooling! And it will crack as it cools if you are playing too rough with it. Maybe you can enlist some little helpers to help you get through the dough.

  Now that you've had you modeling-clay fun, stick the figures in the fridge to cool completely.
Time to go find that bag of chocolate chips you've been hiding from the kids and put it in a double boiler to melt.
Add about a tablespoon of shortening to keep the melt thin...you want to be able to capture all the crevices in your art work and thick chocolate, although tasty, is a poor artistic medium.
To begin with, and to prevent premature dough-drooping, I just dipped the bottoms of each piece and put them back in the fridge to get the chocolate hardened.
After that, go find your basting brush, baby.
It's time to paint.
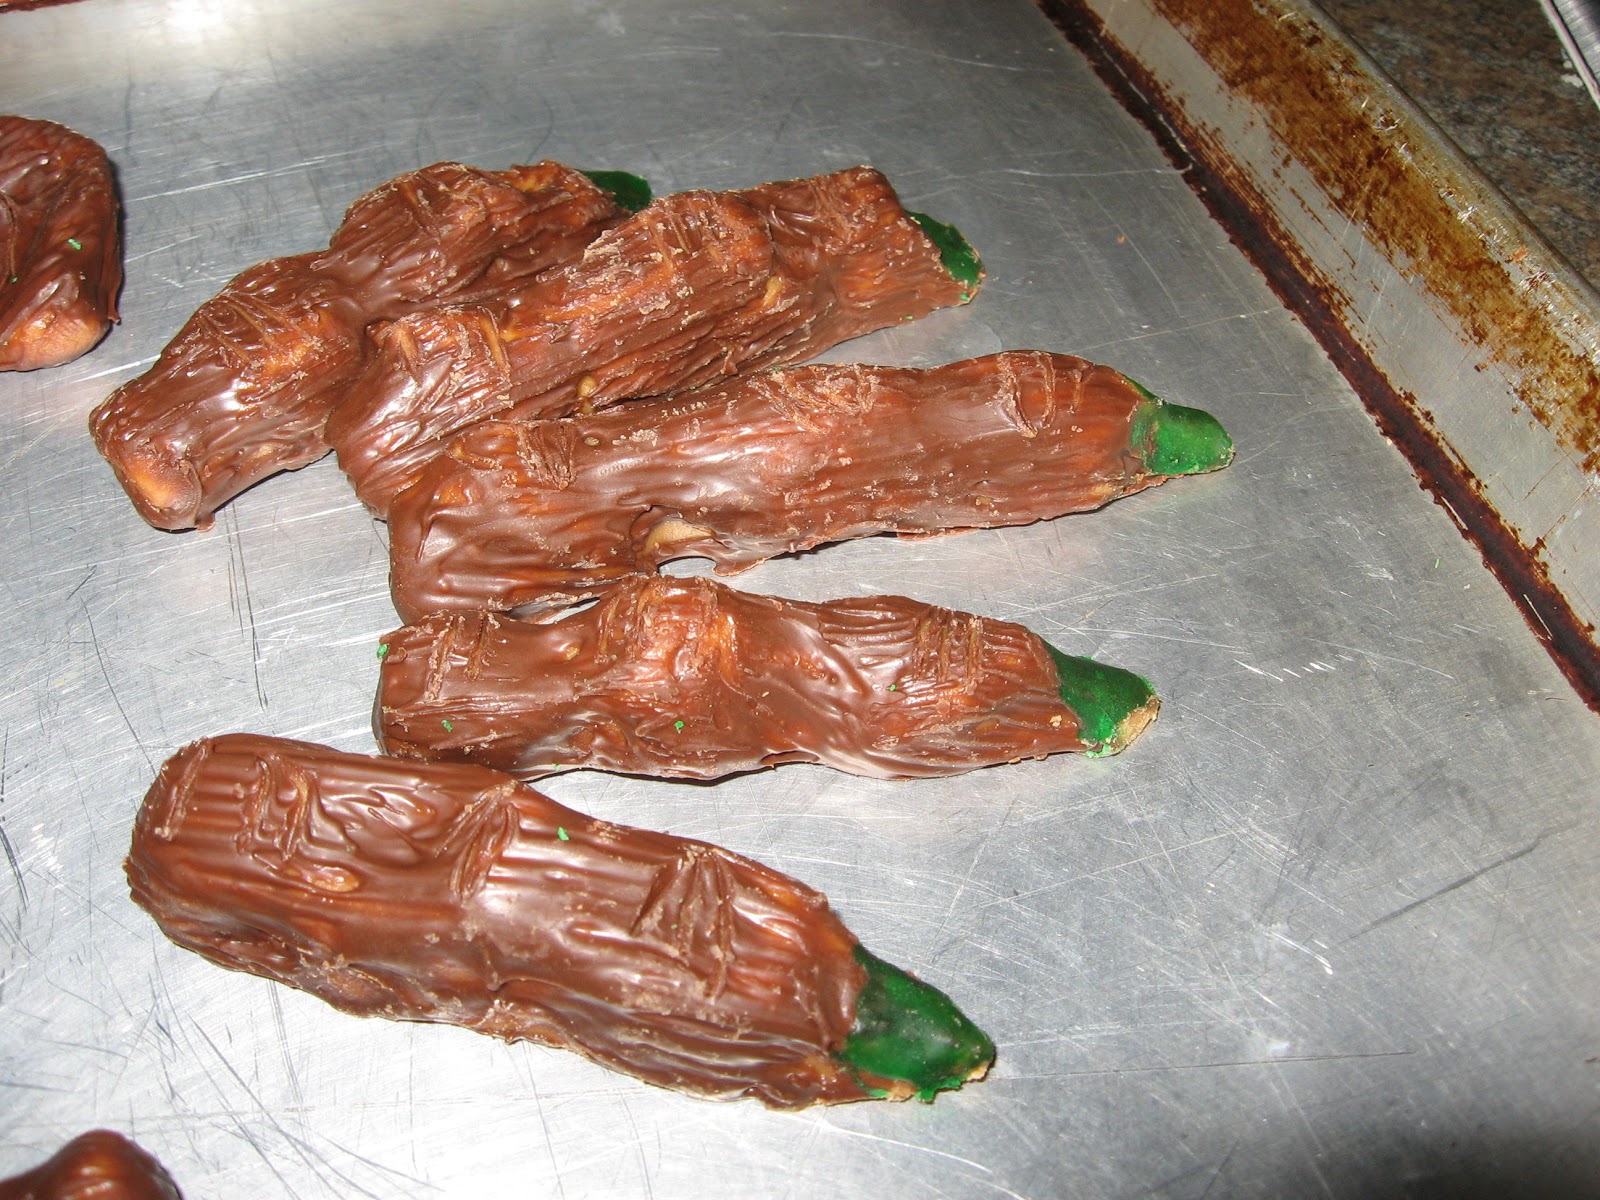
Using fine, even strokes, give your dismembered members a good licking (with the brush). I love the way the chocolate sinks into the crevices and enhances the arthritic knuckles on my witch's fingers. Don't be afraid to leave streaks and even a little naked dough shining through. This ages the pieces and even adds a slightly charred appeal.
Cool in refrigerator.
Not too shabby, eh?
 
 For the fingers, I mixed up some powdered sugar, water and green food dye for some witch-polish.
After the initial layering of chocolate has cooled, give those nails a coat or two.
 
Love love love these grotesquely edible parts!
 
WORD OF CAUTION: This makes a massive batch of dough...enough to fill the bottom of a 9x13 cake pan. For this project, I cut the recipe in half. If you have the help and need a bunch of these, go ahead and make the whole batch. If you are like me, and a lone entity in the kitchen, better half the batch and make your magic a tad simpler.
 
Next up:
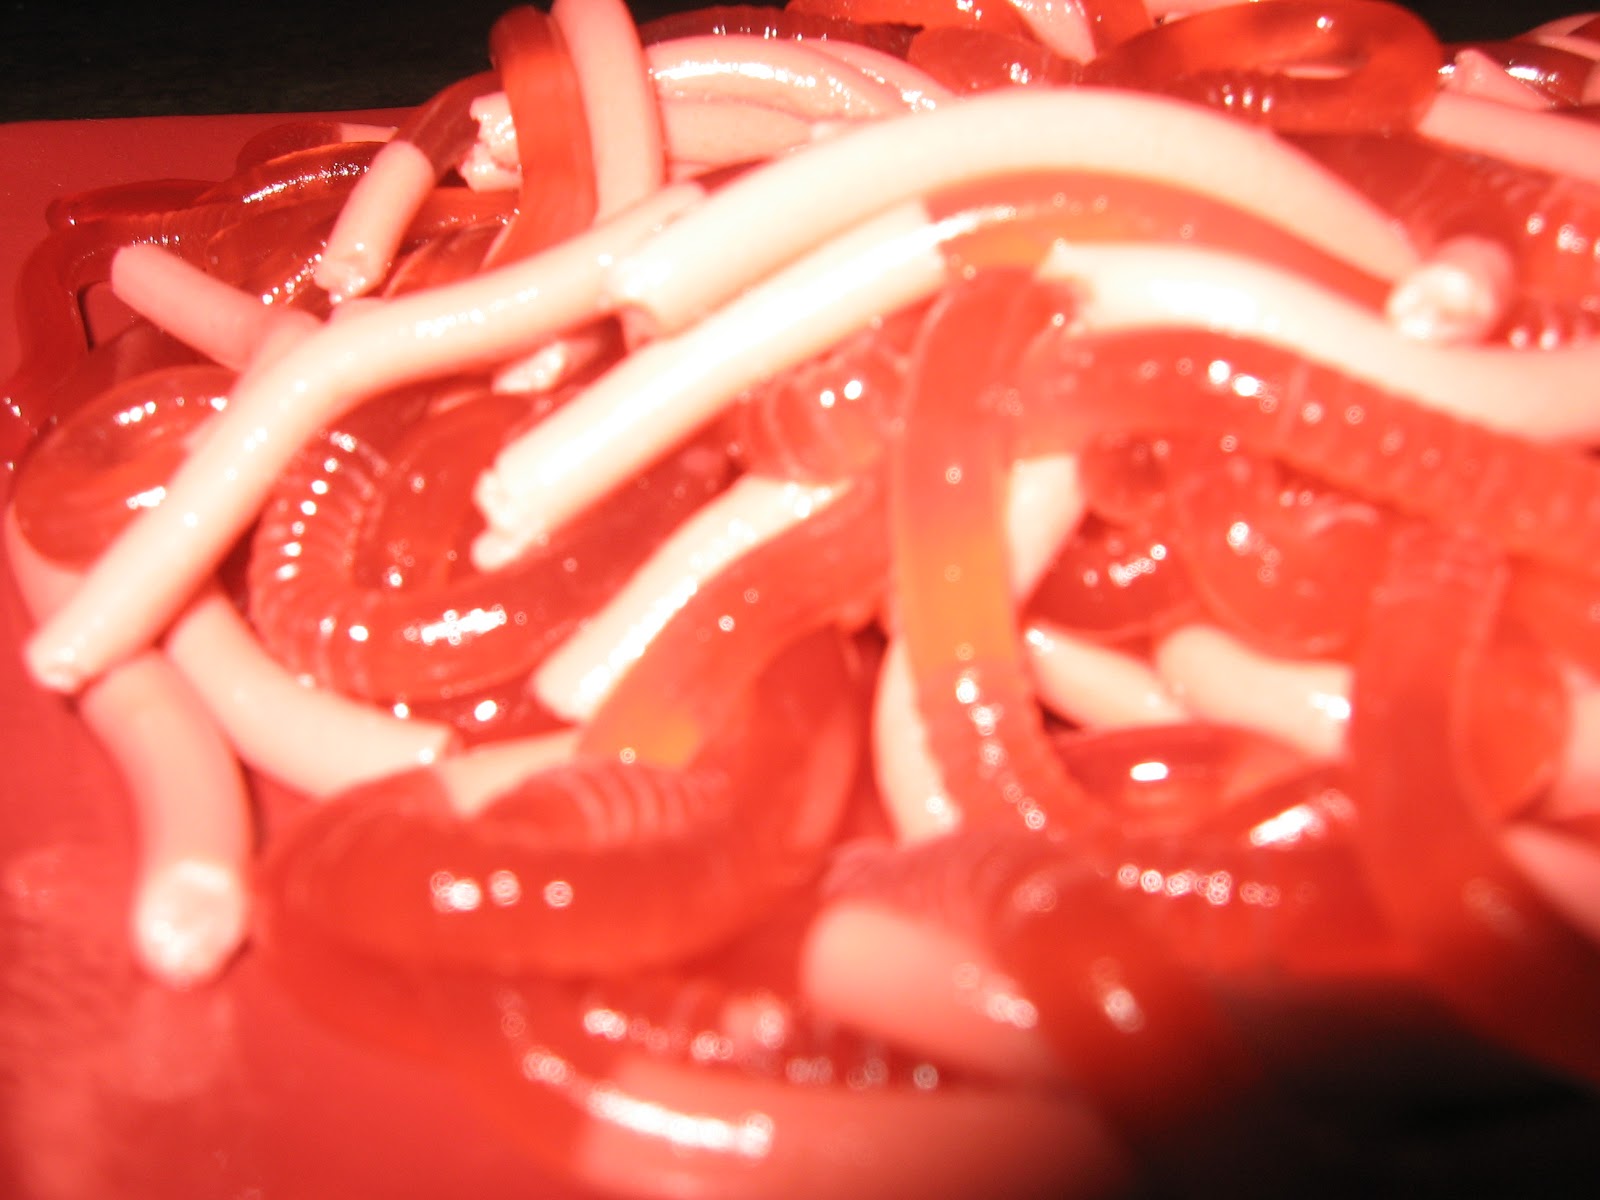
JELLO BLOOD WORMS
...ooOooOOoOoooOoo...
Scared yet?
These little buggers are a ton of fun to eat and show off.
But they are a labor of love in the royal pahtookus to make.
I don't know, if you like long waiting, sticky messes and an hour of extruding slimy, wormy jello out of straws, this may be right up your fun-o-meter!
I hope I don't scare you off them. They are awesome and totally worth the extra effort for a good Halloween party treat.
 
Here's your grocery list:
6 oz. black cherry jello
3 sleeves unflavored gelatin (the box comes with four but you only need three)
100-150 bendy straws
a rubber band (or two)
3/4 cup heavy whipping cream
3 cups clear soda of choice
-or-
you can use 3 cups water. The soda helps with flavor.
non-stick cooking spray
a tall pitcher
 
First things first, pull out the accordion bend of all your straws. Pull them all to their tallest potential. This lovely rippled feature gives your worms their segmented look.
Using your ninja skills, wrangle the straws together into the rubber band(s) so the accordion-end is pointed down. Put your straw bale in your pitcher, making sure the straws do not exceed the pitcher's height and that there isn't a lot of room around the straws. If there is an excess of diameter room, try putting more straws in the pitcher or trying a different, thinner pitcher.
FYI: the straws will fill to the same point that the area surrounding them fills...i.e. if you stick 200 straws in a fat pitcher your worms may only be two inches tall. If you put 100 straws in a slim pitcher, your worms may as tall as the straw. I know that sounds better, but trust me that you are going to want about two inches of free-space at the end of the straw to aid during extrusion!
Got all that?
Alright. Quit fooling with the straws and lets make some jello. 
Boil two cups of your liquid, be it water or soda.
While that is heating, put your other cup of water or soda in a medium glass or metal bowl and add the three sleeves of gelatin and both packages of jello.
Let that sit together until the other is boiling. Add the boiled liquid to the bowl and stir until completely dissolved, about three minutes.
Now add the 3/4 cup of heavy cream and stir well. The cream will eventually separate from the jello but give it a stir anyway.
Pour this lovely, cloudy concoction over your straws into the pitcher, making sure, as I said, that you have about an inch or two of space at the top.
Chill for three to four hours or until totally firm.
 
Now, the fun.
You need to prepare a little work space for yourself in order to finish out these wormies. Get a towel, a couple of plates, your cooking spray, an extra bowl for the empty straws and a wide, shallow pan of hot water (not pictured in the picture below. Just out of camera shot on my stove)
Grab one of your plates and give it a quick spritz of cooking spray.
After you have ensured your worms are firm, run a butter knife around the inside of the pitcher to loosen the excess jello. If you can, yank the entire bale of jello straw worms out of the pitcher. If you cannot do this, don't fret. Both times I made these I couldn't get the suckers out.
Now that you are set up, grab hold of one of the straws and yank it out.
See the excess jello clinging? Run your fingers down the straw to clean it off.
Holding the end with one to two inches of head-space (see...it comes in handy) dip the entire straw in to the hot water for the smallest of seconds. This will loosen the jello and make expulsion easier. Wipe the excess water off the straw onto your towel.
If you have strong fingers, give the straw a steady, firm squeeze down its entire length. The worm should come out with a plop onto your prepared plate.
After about six of these, my fingers were dead. Looking at the other hundred and forty or so, I wanted to cry.
Then, a most genius fact came to my mind;
the human mandible is the strongest jointed system on the body.
I can hold the straw with my teeth!
Now hold on, I can see you cringing...give me credit here, folks. I had no intention of slobbering all over something I intended to give to others.
Very carefully, and avoiding any potential of contamination, I placed the empty end of the straw between my dry, recently brushed and sterilized teeth and used my fingers to extrude the worm from the straw. The outside of the straw was the only contact and seemed a reasonable trade-off to chronic carpel tunnel due to jello-worm-making.
This made the task ultimately more doable. I was able to get through all 150 straws in less than forty minutes using that technique. If it grosses you out, then find another way. Be creative.
 
After about fifty straws, spray the worms with a quick blast of cooking spray and put the plate in the fridge. Get another plate, spray it and begin another fifty straws. After that fifty, spray, refrigerate and move on. Every so often I would check the worms in the fridge to be sure they weren't congealing.
My first batch of worms were a near fail because they got too warm, were too wet and when they went back into the fridge, congealed together into a big lump of what looked like brain-matter.
Not so with batch number two!
I learned my lessons.
1-keep them cool
2-keep them slippery
3-keep them dry


 Aren't they lovely?
 
Mmm...creepy...
 
Have a fun Halloween, everybody!
 
A.S.
Pin It!